The VW restoration spot.

Tuesday, January 31, 2006

Exhaust: The Hunt

I am looking for an exhaust system for my Type IV engine that would fits under the standard rear apron tail-pipe cut-outs.. I found one online, but I think the manufacture is from Europe. The system is expensive and costly to ship to the USA. I am looking for a good'ol U.S. of A reseller of this form factor. I would hate to have to do what I did for my BRM, order 80 of them for cheaper shipping and become a supplier to the U.S. for about 2 months. There is another company called A. C. Industries that has an exhaust configuration for the type IV engine converted for a Type I car. I was thinking about this using twin quiet pack mufflers. This does not have a stock look, so I am still searching.

Monday, January 30, 2006

Pan: Dropped Nicely

All the planning paided off. This is dropped quite nicely. Posted by Picasa

Pan: Custom Front Beam

These are my custom shock towers. The front beam has been modified. The Beam length has been reduced three inches to accommodate my dropped spindles that lowers the car 2.5 inches. The beam is fully adjustable, which can dropped the vehicle another 3 inches in total. To compensate for the lowered vehicle, the shock towers have been completely removed and redesigned. The height of the towers have been raised two inches above stock to increase or preserve the shock travel distance when the car is lowered by the adjustable front-end. If you have ever been to a Volkswagen show before and you managed watched people drive in with their low-riding show Beetles, you can not help but noticed the heads of the drivers bouncing around after encountering the slightest bump (pebble) on the road. This modification was made to eliminate this problem. If you know my height (6'2"), you would understand why I don't want my head bouncing around in my bug.

Sunday, January 29, 2006

General: The Work Zone

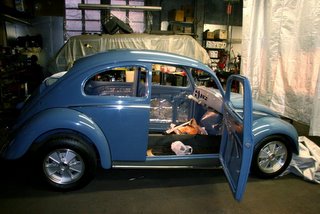
This is my new office called 58 Work Zone. A headliner installation is notoriously known to be the most difficult part of a VW restoration process. I spent a total of 5 hours today on my knees inside of this car. I went to Circuit city to purchase sound insulation for the roof and doors. This was the biggest hassle of my day. There are two major products in the car audio industry to keep your car from rattling when music plays. They are Tsunami and Dinomat. I purchased 20 square feet of Tsunami insulation padding 10 sheets, 2' x 1'. After I stuck four pads on the inside roof, I realized I only had 5 more pads remaining. At $133 dollars per kit, I calculate each sheet to cost $13.30. Of course I went back to Circuit City to fight with the manager in the Audio department. There wasn't much of a fight, he opened another pack after I grumbled a little bit. You can see the installation of the pads on the driver's side door of this photo.

Headliner: Rear Padding Installed.

The rear padding installed. YAH! I can not write too much here, one of my hands are stuck to my forehead making it difficult type home row key style.

Headliner: The Glue

This is the first hole cut out of the padding. It must be modified to fit the actual size of the window, making sure the hole is slightly larger than the window size to avoid the headliner from lumping up in the corners near the windows. The glue I used for the adhesive was 3M 80. I think the next time I start to finish this install, I am going to buy some rubber gloves. My hands were stuck to every damn thing imaginable. I scratched myself on the ass a few times and had difficulty getting my hands off of it. Anyways, other than that, things are going slower than I thought, but quite smoothly. If you need for me to do this to your car, I'll charge you $60 up to this point (10 percent of $600 is $60) .

Headliner: Install begins in the rear.

Installing padding for my headliner begins in the rear of my car. I started by cutting a square large enough to cover the back window and side post. I bought about 40 mini clips from Home Depot to hold the felt in place while I measured the approximate size of the padding. The purpose of the padding is to give the headliner body when it is covered. I was told by many people that I should pay a professional to perform this process, but at 26k plus, that is about 18k over my project budget, I think I'll save myself $600 and try it myself first. The most I'll loose if this doesn't work out is $100. I have approximately six times to try before I should have taken this job to a professional. Hell, if all works out, I can install headliner as a way to make side cash.. Hehehe.

The Bug

I'll begin with the Headliners.